
Table of Contents
ToggleA well-planned deck furniture layout turns an underused slab of decking into the most popular spot in the house. But most homeowners eyeball their arrangement, then wonder why the space feels cramped or awkward. The difference between a deck that works and one that frustrates comes down to intentional planning, measuring zones, thinking through traffic patterns, and placing furniture where people actually want to sit. Whether working with a sprawling multi-level deck or a modest 10×12 platform, the right layout maximizes usable square footage and creates distinct areas for dining, lounging, and entertaining.
Key Takeaways
- Deck furniture layout planning requires measuring your space, defining distinct zones for dining, lounging, and entertaining, and sketching a scaled outline before purchasing or arranging pieces.
- Maintain clear walkways of 30-36 inches and respect the 18-inch buffer rule between seating and railings to ensure traffic flow and prevent a cramped, unsafe feel.
- A well-designed conversation area uses U-shaped or L-shaped seating within a 6-8 foot circle, anchored by a low coffee table or fire pit and defined with an outdoor rug for visual boundaries.
- Position outdoor dining furniture within 10 feet of the kitchen door with 42-48 inches of clearance around the table, and consider rounded or oval shapes to improve traffic flow on smaller decks.
- Multi-functional decks benefit from modular sectionals, mobile carts with locking casters, and flexible lighting that adapts to different activities and allows furniture arrangements to change easily.
- On compact decks under 120 square feet, prioritize dual-purpose pieces with exposed legs, skip traditional coffee tables in favor of nesting C-tables, and test your deck furniture layout with cardboard or tape before final placement.
How to Plan Your Deck Furniture Layout
Before dragging furniture outside, map the deck on paper or use a basic design app. This prevents the common mistake of buying pieces that crowd walkways or block railings.
Measure Your Space and Define Zones
Start by measuring the deck’s total dimensions and noting any fixed elements, stairs, doors, built-in benches, railings, or grill hookups. Sketch a scaled outline (¼-inch graph paper works well, with each square representing 1 foot).
Next, identify what the deck needs to do. Most homeowners benefit from defining two or three zones: a dining area, a conversation zone, and sometimes a prep or bar station. Each zone requires different clearances.
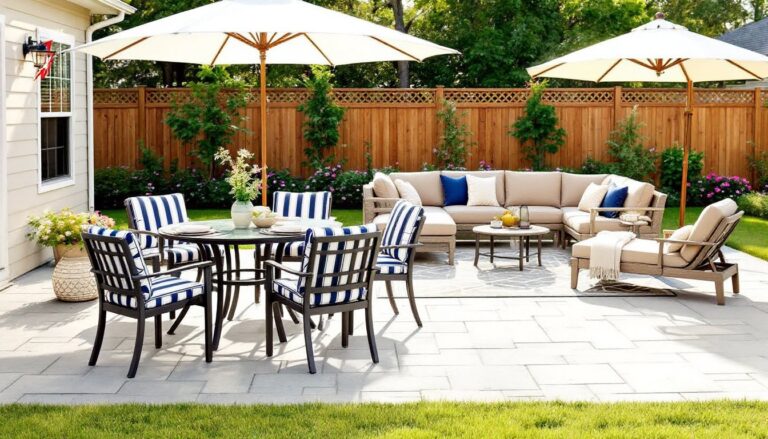
For dining, allow at least 36 inches behind each chair so people can push back and stand without hitting a railing or planter. A standard 6-person rectangular table measures roughly 36×72 inches, so the dining zone footprint becomes about 9×12 feet minimum.
Conversation areas centered on a fire pit or coffee table need 18-24 inches between seat edges for comfortable legroom. A typical sectional or four-chair grouping occupies an 8×10-foot zone.
Mark these zones on the sketch with light pencil. Leave corridors of at least 30-36 inches for primary walkways, narrower paths feel pinched when carrying a tray of drinks or navigating in the dark. If the deck connects to the yard via stairs, keep that route clear and direct.
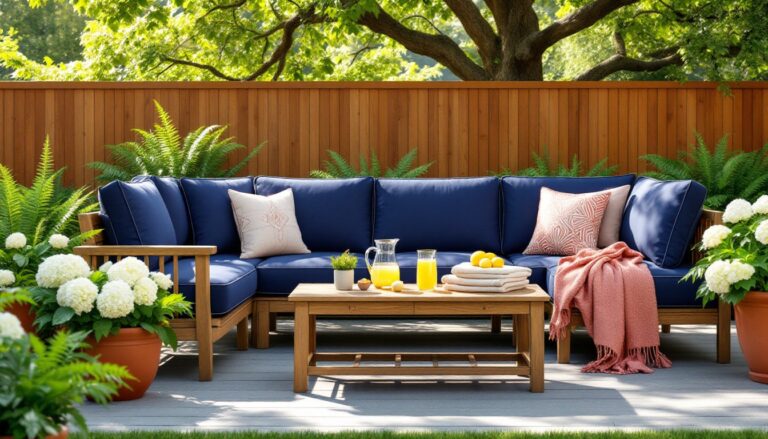
Cozy Conversation Area Layouts
A conversation zone pulls people together without shouting across the deck. The goal is intimate seating that encourages eye contact and easy talk.
Arrange seating in a U-shape or L-shape around a low coffee table or fire pit. This layout keeps everyone within a 6-8 foot circle, the natural range for casual conversation. Avoid straight-line seating (sofa against the railing with chairs opposite): it feels like a waiting room.
Anchor the zone with a 5×7-foot or 6×9-foot outdoor rug. Rugs define boundaries visually and make the space feel finished. Choose a flatweave or low-pile synthetic rug that drains water and resists mildew.
Place side tables within arm’s reach of each seat, 18 inches from the seat edge works well. This prevents the awkward lean-and-reach for a drink. Nesting tables or C-tables that slide under chair arms save space on smaller decks.
If the deck gets afternoon sun, position seating to face away from the glare or add a cantilever umbrella that tilts. A 9-foot offset umbrella covers a typical four-seat grouping without a center pole blocking conversation. For evening use, string café lights overhead or add a pair of battery-powered LED lanterns on side tables.
Outdoor Dining Deck Arrangements
Outdoor dining areas work best when they’re easy to serve and comfortable to linger in. Poor placement, like tucking the table into a corner far from the kitchen door, kills the convenience that makes deck dining appealing.
Position the dining set close to the house, ideally within 10 feet of the door used most often. This cuts down trips when shuttling food, dishes, and condiments. If the deck has multiple access points, choose the one nearest the kitchen or grill.
Leave 42-48 inches of clearance around the table if space allows. This accommodates pulled-out chairs and lets someone walk behind seated diners without turning sideways. On tighter decks, 36 inches works but feels snug during a full meal.
For tables seating six or more, consider an oval or round shape instead of rectangular. Rounded edges ease traffic flow and add seats without sharp corners poking into walkways. A 60-inch round table seats six comfortably in about the same footprint as a 36×72-inch rectangle.
Pair the table with stackable or folding chairs if the deck serves double duty. After dinner, stack four chairs in a corner to open the space for mingling. Alternatively, use a bench on one side of the table, it tucks fully underneath when not in use and can seat three in a pinch.
Overhead shade matters for daytime meals. A 9×12-foot rectangular umbrella or a retractable awning keeps sun off plates and faces. If installing a permanent structure, check local codes, some jurisdictions classify pergolas or fixed canopies as accessory structures requiring a permit.
Multi-Functional Deck Layout Ideas
Decks that handle multiple activities, grilling, dining, lounging, kids’ play, need flexible furniture and smart zoning. The key is choosing pieces that adapt or move easily.
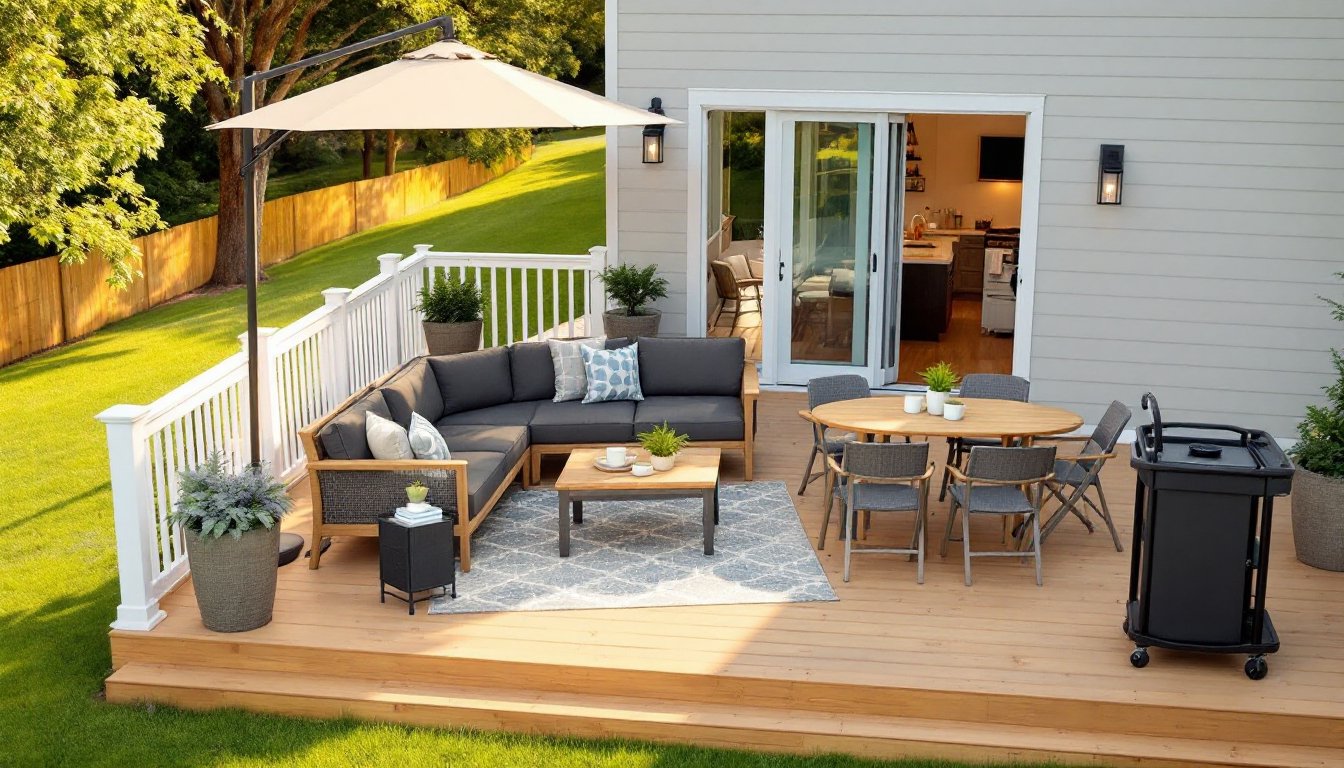
Use modular sectional seating that reconfigures for different occasions. A three-piece sectional can form an L-shape for movie nights, then separate into individual chairs for a buffet party. Look for sets with armless middle sections: they’re easier to rearrange than pieces with fixed arms.
Create a mobile bar or prep cart instead of a built-in counter. A cart with locking casters can serve drinks during a party, then roll next to the grill as a landing zone for platters. Many outdoor entertaining setups benefit from this kind of flexibility.
Define zones with movable planters rather than permanent railings or built-ins. A pair of large resin planters (18-24 inches tall) can separate the dining area from the lounge without blocking sightlines. When the deck needs to feel open for a crowd, slide the planters to the perimeter.
If the deck doubles as a play zone, keep a weatherproof storage bench along one side for toys, outdoor games, or pool floats. A 4-foot bench with a lift-top seat provides about 10 cubic feet of storage and doubles as extra seating during gatherings.
For evening flexibility, incorporate portable lighting. Battery-powered LED strips, rechargeable table lamps, or solar path lights eliminate the need for hardwired fixtures and let the homeowner adjust light placement as furniture moves.
Small Deck Furniture Arrangement Tips
A compact deck, anything under 120 square feet, demands ruthless editing and smart furniture choices. Every piece needs to earn its spot.
Measure furniture before buying. A loveseat listed as “small” might still run 60 inches wide, eating half the width of a 10-foot deck. Prioritize pieces with exposed legs and open frames: they feel lighter than skirted or solid-base furniture. Many successful furniture arrangements on small decks rely on visual lightness.
Choose dual-purpose pieces. An ottoman with a removable tray top serves as a coffee table, footrest, and extra seat. A dining table with a drop leaf expands for meals, then folds down to 18 inches deep as a console against the railing.
Go vertical. Wall-mounted folding tables and rail-hung planters free up floor space. A fold-down table (24×36 inches) mounts to the house wall and supports two place settings, then drops flat when not needed. Check that fasteners hit wall studs, deck siding alone won’t support the weight of a loaded table.
Skip the coffee table. On decks under 100 square feet, a traditional coffee table crowds the center. Use nesting C-tables or side tables instead. They slide next to chairs when needed and tuck away when not.
Anchor one corner with a small bistro set (two chairs and a 24-30 inch round table) or a single lounge chair with an attached side table. Placing furniture at an angle across a corner can actually maximize usable space by creating a defined zone that feels intentional rather than cramped.
Applying thoughtful design strategies helps small decks feel purposeful rather than cluttered.
Traffic Flow and Spacing Considerations
Traffic flow makes or breaks a deck layout. Furniture that blocks the natural path from door to stairs forces awkward detours and discourages use of the space.
Map the primary corridor first. Measure from the most-used door to the main stairs or yard access. Keep this path 36-42 inches wide and free of furniture legs, planters, or rugs that create trip hazards. If the deck has multiple doors (say, from the kitchen and the living room), avoid placing furniture in the zone between them.
Respect the 18-inch rule. Leave at least 18 inches between the back of any seating and a railing, planter, or wall. This prevents the trapped feeling when someone sits down and realizes they’re pinned against the edge. For dining chairs that need to slide back, increase this to 36 inches minimum.
Test the layout before anchoring anything. Use cardboard boxes, painter’s tape on the deck surface, or even folding chairs to mock up furniture placement. Walk the deck as if carrying a tray, pushing a stroller, or holding a child’s hand. Tight spots reveal themselves immediately.
Consider door swing. If the entry door swings outward onto the deck, make sure furniture doesn’t block its arc. A door that hits a chair back every time it opens is a constant annoyance. Mark the swing radius with tape during layout planning.
Level changes need extra clearance. If the deck has steps between levels or a sunken seating area, add 6-12 inches of buffer space at the top and bottom of stairs. This prevents the hazard of backing into a step while standing up from a chair. Following proven furniture placement principles reduces these common pitfalls.
Account for umbrella and awning clearance. A tilted cantilever umbrella can swing out an extra 2-3 feet from its base depending on wind or adjustment. Make sure the arc doesn’t cross a walkway or hit the railing when opened. When planning layouts, resources like Southern Living often showcase regional porch and deck flow ideas that address these practical concerns.
Consider how people naturally gather. They’ll cluster near the grill, linger at the table, or drift to the railing to watch the yard. Good spatial planning anticipates these patterns instead of fighting them. Position seating to take advantage of views or shade, and leave open pockets where three or four people can stand and chat without clogging a walkway. Thoughtful spacing turns a deck from an obstacle course into a space that feels easy and welcoming. For inspiration on cohesive outdoor environments, sites like Gardenista provide design examples that integrate furniture flow with landscape planning.